Most triathletes obsess over their swim splits, bike wattage, and run pace. They track every metric, analyze every session, and fine-tune their equipment for marginal gains. Yet many completely overlook the fourth discipline: nutrition. I learned this lesson the hard way during my first Olympic-distance race when I hit the wall at mile 18 of the bike leg, bonking so hard I could barely hold 15 miles per hour.
Proper fueling isn’t just about eating enough calories. It’s a systematic approach to maintaining blood glucose, preventing dehydration, and keeping your gastrointestinal system happy under extreme stress. Get it right, and you’ll finish strong with energy to spare. Get it wrong, and you risk a DNF, a miserable slog to the finish, or worse – a medical tent visit.
In this guide, I’ll walk you through exactly how to fuel during a triathlon, from carb loading three days out to your final gel on the run course. You’ll learn distance-specific strategies, hydration protocols, and the gut training techniques that separate successful finishers from walking casualties.
Table of Contents
How to Fuel During a Triathlon: The Complete Strategy
Triathlon fueling is the strategic intake of carbohydrates, fluids, and electrolytes during a race to maintain energy levels, prevent dehydration, and avoid gastrointestinal issues. Think of it as managing a fuel tank that depletes faster than you can refill it – your goal is to slow that depletion enough to reach the finish line.
The challenge? You’re trying to digest food while diverting blood flow to working muscles. Your body can only absorb so many carbohydrates per hour – typically 30 to 120 grams depending on your training and the carb source. Exceed that threshold, and you’ll end up with sloshing stomach, cramps, or worse.
Successful fueling follows a simple hierarchy: pre-race nutrition sets your glycogen stores, during-race carbs maintain blood glucose, and hydration keeps everything flowing. Miss any piece, and the whole system breaks down.
Understanding Your Body’s Energy Systems
Before you can fuel effectively, you need to understand what you’re actually fueling. Your body stores carbohydrate as glycogen in your muscles and liver. A well-trained athlete might store 1,200 to 2,000 calories worth – enough for roughly 90 minutes to 2 hours of moderate intensity exercise.
Glycogen and Carbohydrate Metabolism
During exercise, your body breaks down glycogen into glucose for immediate energy. Once glycogen stores drop below critical levels – typically after 60 to 90 minutes of sustained effort – you bonk. Suddenly your easy pace feels impossible. Your brain gets foggy. Your legs turn to concrete.
Consuming carbohydrates during exercise spares your limited glycogen stores and maintains blood glucose for your brain and working muscles. The key is matching your intake to your absorption capacity. Untrained guts might only handle 30 grams per hour. Well-trained athletes using multiple transportable carbohydrates (glucose plus fructose) can absorb 90 to 120 grams per hour.
Why Bonking Happens
Bonking – also called hitting the wall – occurs when your body runs out of glycogen and can’t maintain blood glucose levels. Your brain, which relies almost exclusively on glucose, starts shutting down non-essential functions. You feel dizzy, irritable, and unable to think clearly.
Meanwhile, your muscles switch to fat metabolism, which requires more oxygen to produce the same energy. Your pace drops dramatically. In a triathlon, this usually happens on the bike or early in the run, when glycogen depletion meets the demands of a new discipline.
Prevention is simple: start fueling before you feel hungry or tired. By the time you notice energy dropping, it’s already too late to recover fully during the race.
Sweat Rate and Fluid Loss
Your body loses fluid through sweat to cool itself during exercise. Sweat rates vary dramatically – from 500 ml to over 2 liters per hour depending on heat, humidity, and individual physiology. Losing just 2 percent of body weight through sweat impairs performance. Hit 5 percent, and you’re in serious trouble.
But sweat isn’t just water. It contains sodium – typically 400 to 1,000 mg per liter. Replace only the water, and you risk hyponatremia, a dangerous condition where blood sodium levels drop too low. Symptoms include bloating, nausea, headache, and in severe cases, seizures.
That’s why proper hydration requires both fluid and electrolytes, particularly sodium. Sports drinks are formulated specifically for this purpose.
Pre-Race Nutrition: Setting Yourself Up for Success
Race day fueling starts days before the starting gun. Your goal during race week is to top off glycogen stores while keeping your gut calm and ready.
Carb Loading Strategy (3-7 Days Before)
For races lasting longer than 90 minutes, carb loading can increase glycogen stores by 50 to 100 percent. The traditional approach involves a depletion phase followed by loading, but modern protocols are simpler: maintain normal training through 3 days out, then increase carbohydrate intake to 10 to 12 grams per kilogram of body weight for the final 2 to 3 days.
For a 70 kilogram athlete, that’s 700 to 840 grams of carbohydrate daily. That doesn’t mean eating junk – focus on rice, pasta, oats, bananas, bread, and potatoes. Reduce fiber and fat to avoid GI distress. Keep protein moderate.
For sprint triathlons, skip carb loading entirely. Your normal glycogen stores are sufficient.
Race Week Meal Plan Examples
Three days out, your meals should center on carbohydrates. Think oatmeal with banana and honey for breakfast, rice bowl with chicken and soy sauce for lunch, pasta with marinara for dinner. Snack on pretzels, energy bars, and fruit throughout the day.
Two days out, continue the high-carb pattern. Avoid high-fiber foods like beans, lentils, and large salads. Skip spicy or unfamiliar foods that might upset your stomach.
The day before, eat your largest carbohydrate meal at lunch rather than dinner. This gives your body time to digest and store the glycogen without leaving you bloated on race morning.
The Night Before: Dinner Timing and Composition
Your pre-race dinner should be carbohydrate-rich, moderate in protein, low in fat, and low in fiber. Aim to finish eating 12 to 14 hours before your start time. For an 8 AM start, that means dinner by 6 PM.
Good options include pasta with marinara sauce, white rice with grilled chicken, or a baked potato with salt and a small amount of butter. Avoid cream sauces, fried foods, heavy meats, and large salads.
Drink water normally throughout the day, but don’t force fluids. Your urine should be light yellow, not clear.
Race Morning: Breakfast and Final Preparations
Race morning nutrition follows a simple principle: top off glycogen stores without overloading your digestive system. You want energy available, not sitting heavy in your stomach.
Timing Your Pre-Race Meal (2-4 Hours Before)
Eat your final substantial meal 2 to 4 hours before your start time. This gives your body time to digest while keeping blood glucose elevated. Closer to 4 hours for larger meals, closer to 2 hours for smaller, easily digestible options.
For a 7 AM start, wake up at 4 AM to eat by 4:30. Then relax, use the bathroom, and head to transition. For afternoon starts, eat a normal breakfast, then have a smaller snack 2 hours before.
What to Eat: Carb-Rich, Low Fiber, Low Fat
Ideal race morning foods include oatmeal with banana and honey, white toast with jam, a plain bagel, or pancakes with syrup. Aim for 100 to 150 grams of carbohydrate. Keep protein minimal (10 to 20 grams) and fat under 10 grams.
Some athletes do well with liquid carbs – a sports drink or fruit smoothie. These digest faster and reduce the risk of GI issues.
My go-to breakfast before long races is instant oatmeal made with water, topped with half a banana and a drizzle of honey. It’s bland, predictable, and has never let me down.
What If You’re Too Nervous to Eat?
Race day nerves can suppress appetite completely. If you can’t face solid food, try liquid calories. A fruit smoothie, meal replacement shake, or even just sports drink provides carbohydrates without requiring you to chew.
Start with small sips. Often, once you get something in your stomach, your appetite returns. Even 50 grams of carbohydrate is better than nothing.
Some athletes rely on simple carbs they know they can tolerate: white rice, plain pasta, or even gummy candies. The exact food matters less than getting calories in.
Pre-Race Hydration and Caffeine
Start sipping fluids as soon as you wake up. Aim for 500 to 750 ml in the 2 to 4 hours before your start. Include electrolytes, especially sodium, to help your body retain the fluid.
Caffeine takes 30 to 60 minutes to peak in your system. If you plan to use it during the race, consider a small dose (50 to 100 mg) with your pre-race meal. This could be a cup of coffee, tea, or a caffeinated gel.
Avoid trying new caffeine products on race day. If you don’t normally drink coffee, race morning isn’t the time to start.
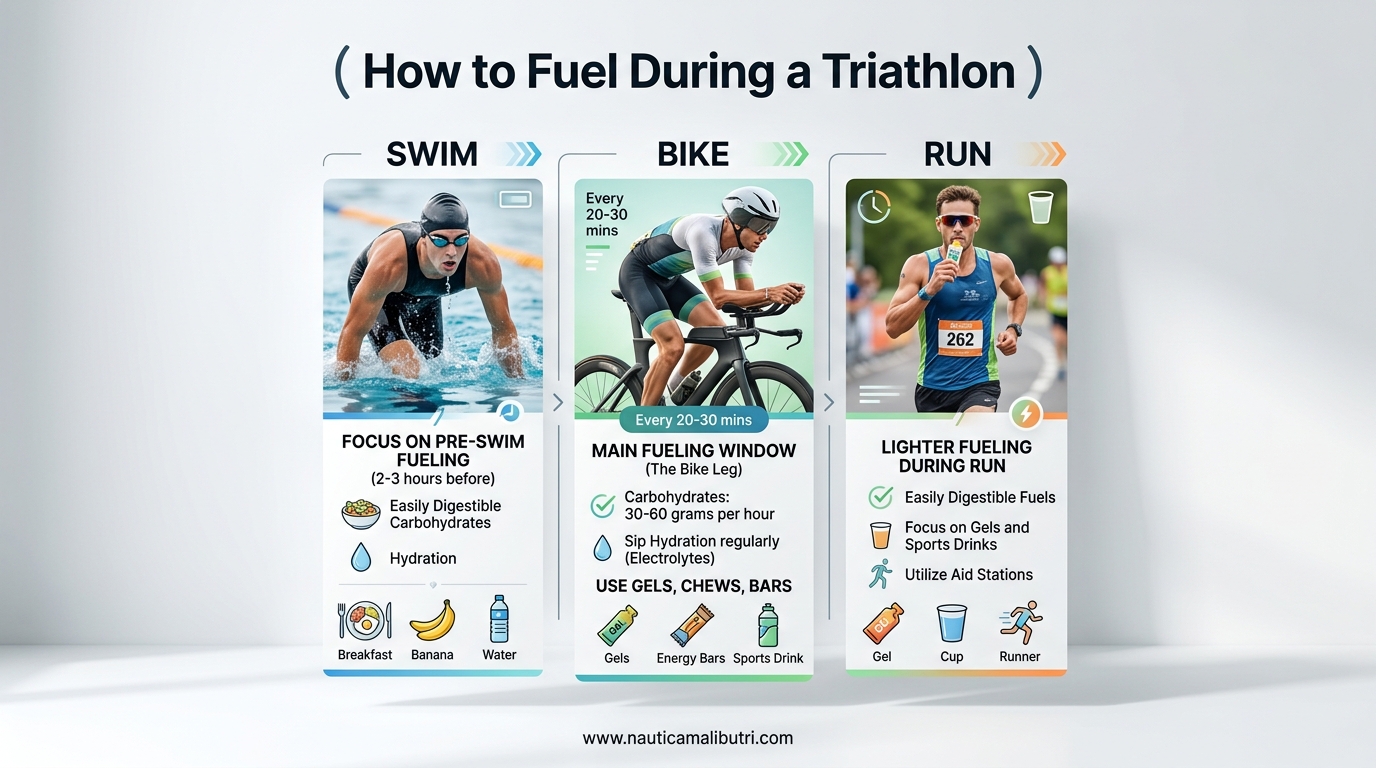
Distance-Specific Fueling Guidelines
Not all triathlons require the same fueling approach. A sprint race needs minimal intervention, while an Ironman demands a comprehensive nutrition plan executed over many hours.
Sprint Triathlon (Under 90 Minutes): Minimal In-Race Fueling
For most athletes, a sprint triathlon doesn’t require in-race fueling beyond water. Your pre-race breakfast and stored glycogen can carry you through. If you’re particularly fast (finishing under 60 minutes) or prone to low blood sugar, consider one gel or a few sips of sports drink.
Focus instead on hydration: drink to thirst at aid stations, especially if it’s hot. There’s no need for elaborate fueling strategies here.
Olympic Distance (90 Minutes to 3 Hours): 30-60g Carbs Per Hour
Olympic distance races typically last 2 to 3 hours for most athletes, crossing the threshold where glycogen depletion becomes a concern. Target 30 to 60 grams of carbohydrate per hour starting early in the bike leg.
A practical approach: consume one gel or equivalent (20 to 25 grams carbs) every 30 to 45 minutes on the bike. Take a sip of sports drink at each aid station. If the run will take over an hour, take one gel at the start of the run.
Half-Ironman/70.3 (4-7 Hours): 60-90g Carbs Per Hour
Half-Ironman races require serious fueling. Target 60 to 90 grams of carbohydrate per hour, starting from the first 15 minutes of the bike leg. Waiting until you feel hungry is a guaranteed recipe for bonking.
On the bike, alternate between solids (bars, chews) and liquids (sports drink) to prevent flavor fatigue. Take something every 15 to 20 minutes. Set a watch alarm if you need reminders.
For the run, switch to easily digestible options: gels, chews, or cola at aid stations. Target 40 to 60 grams per hour since running makes digestion harder.
Full Ironman/140.6 (8-17 Hours): 90-120g Carbs Per Hour
Full Ironman races are eating contests with some exercise thrown in. Elite athletes now target 90 to 120 grams of carbohydrate per hour using multiple transportable carbohydrates (glucose plus fructose in a 2:1 ratio).
This requires gut training – you cannot simply decide on race day to consume this much. Build up gradually in long training sessions, starting at 60 grams per hour and increasing by 10 to 15 grams every few weeks.
Your Ironman nutrition plan should be detailed and practiced. Know exactly what you’ll eat at each aid station, what you’ll carry, and what your backup options are.
Bike Leg Fueling Strategy
The bike leg is your primary opportunity to fuel. You’re moving slower than running, which means blood flow to your gut is better. You can carry more supplies. You have easier access to nutrition. Waste this opportunity, and you’ll suffer on the run.
Why the Bike Is Your Main Fueling Opportunity
Cycling allows for easier digestion than running. The lower impact and higher position means less stomach jostling. You can store nutrition in a bento box, top tube bag, or back pockets without it affecting your aerodynamics much.
Think of the bike as your fueling foundation. Whatever you fail to consume here, you’ll pay for on the run. Most experienced triathletes front-load their nutrition, consuming 60 to 70 percent of their race calories on the bike.
Aerodynamic Fueling: Bottles and Bento Boxes
Set up your bike for easy fueling access. A bento box on your top tube keeps gels and bars within reach. An aero bottle between your arms lets you sip without breaking position. Frame bottles should be reachable without sitting up.
Practice grabbing bottles from aid stations at speed. In my first 70.3, I fumbled a bottle grab and lost 30 seconds fumbling around. Now I practice this in training.
Carry more than you think you’ll need. Mechanical issues, headwinds, or a slower-than-expected pace can extend your time on the bike. A spare gel or two in your saddle bag is cheap insurance.
Timing Your Intake on the Bike
Start fueling within the first 15 to 20 minutes of the bike leg. Your body is already burning through glycogen from the swim. Waiting until you’ve been riding an hour puts you in a deficit you’ll never recover from.
Set a timer for every 15 to 20 minutes as a reminder to consume something. Alternate between carbohydrate sources to maximize absorption. If using gels, follow with water to aid digestion and prevent that sticky-mouth feeling.
Drink to thirst, but aim for roughly 500 to 750 ml of fluid per hour depending on conditions. In hot races, this might increase to 1 liter. In cool weather, you might need less.
Transition Zone Fuel Prep (T1)
Set up your bike nutrition in transition before the race starts. Fill bottles with your chosen sports drink. Place gels or bars in your bento box or tape them to your top tube. The fewer decisions you have to make during the race, the better.
If the race provides on-course nutrition you plan to use, make sure you’ve practiced with that specific brand. Aid stations typically offer water, sports drink, and sometimes gels or bananas.
Consider leaving a bottle of your preferred drink in special needs if the race offers it. This is your backup if on-course nutrition doesn’t agree with you.
Run Leg Fueling Strategy
The run is where nutrition plans go to die. Jostling stomach, higher heart rates, and mounting fatigue make digestion harder. Yet this is when fueling matters most – you’ve already depleted significant glycogen on the bike.
Aid Station Strategy
Know what each aid station offers before the race. Most triathlons publish this information. Plan which stations you’ll take calories at and which you’ll just grab water.
At aid stations, grab and move. Don’t stop to consume – walk if you must, but keep progressing. Take small sips rather than chugging. Spilling water or sports drink down your front is better than choking on it.
If using on-course nutrition, take it at the first station that offers it after starting the run. Don’t wait until you feel tired – by then, it’s too late.
Gels vs Liquids on the Run
Gels work well for shorter runs but become challenging in longer events. They’re concentrated and require water to digest properly. In a marathon-length run, many athletes switch to liquid calories exclusively.
Cola is a popular option at Ironman aid stations for good reason. The sugar provides quick energy, the caffeine helps with focus, and the carbonation can settle an unsettled stomach. Just don’t try it for the first time on race day.
Chews can be easier to consume than gels when your mouth is dry from dehydration. They take longer to eat, though, which can be problematic at crowded aid stations.
Managing GI Distress While Running
If you feel nausea or stomach cramping, slow down. Walking for 30 to 60 seconds can reduce the jostling enough to let your stomach settle. Sip water or a bland drink. Avoid taking more calories until symptoms pass.
Flavor fatigue is real. After hours of sweet gels and drinks, your body may reject them. Many races offer savory options like broth or pretzels at later aid stations. These can be a lifesaver in the final miles.
If you vomit, don’t panic. Take small sips of water or electrolyte drink and let your stomach rest. You can often recover and finish strong if you don’t try to force more calories immediately.
Hydration Guidelines: The Five Rules
Proper hydration is arguably more important than calorie intake. You can finish a triathlon under-fueled. You cannot finish severely dehydrated. Follow these five rules to stay on top of your fluid needs.
Rule 1: Know Your Sweat Rate
Weigh yourself naked before and after a training session, accounting for any fluid consumed. Each kilogram of weight lost equals roughly 1 liter of sweat. Divide by hours exercised to get your sweat rate.
For example, if you lose 1.5 kg over 2 hours and drank 500 ml, your sweat rate is (1.5 + 0.5) / 2 = 1 liter per hour. This varies with heat, humidity, and intensity, so test in conditions similar to your race.
Rule 2: Replace Sodium Lost in Sweat
Sweat contains sodium – anywhere from 400 to 2,000 mg per liter depending on the individual. If you see white salt stains on your clothes or skin after training, you’re a salty sweater and need more sodium.
Most sports drinks contain 200 to 700 mg of sodium per liter. Salty sweaters may need additional electrolyte supplements or salt capsules, especially in hot conditions or long races.
Rule 3: Don’t Overdrink
Hyponatremia – low blood sodium – is more common than dehydration in long-distance triathlons. It happens when athletes drink too much plain water without replacing sodium. Symptoms include bloating, nausea, headache, and confusion.
Drink to thirst rather than forcing a set amount per hour. Your body is remarkably good at telling you what it needs if you listen. Use sports drinks or electrolyte tablets, not just water.
Rule 4: Practice in Training
Never use a hydration strategy on race day that you haven’t tested in training. Practice drinking from bottles while riding. Practice grabbing cups at speed while running. Learn how your stomach tolerates different volumes and concentrations.
Your long training sessions are the perfect laboratory. Test different products, different volumes, and different timing. Note what works and what doesn’t.
Rule 5: Adjust for Conditions
Hot, humid conditions dramatically increase fluid needs. Cool, overcast days reduce them. Don’t stick to a rigid plan if the weather changes. Drink more when it’s hot. You can get away with less when it’s cool.
Also consider humidity. Sweat evaporates more slowly in humid conditions, making it harder for your body to cool itself. You’ll need more fluid and may benefit from dumping water on your head and body at aid stations.
Training Your Gut: The Most Overlooked Step
Here’s the truth most beginners learn too late: your digestive system needs training just like your heart and muscles. You cannot expect to consume 90 grams of carbohydrate per hour on race day if you’ve never practiced it in training.
Gut training involves gradually exposing your digestive system to increasing amounts of carbohydrate during exercise. Start with 30 grams per hour during long sessions. Every 2 to 3 weeks, increase by 10 to 15 grams. Over months, you can train your gut to handle 90 to 120 grams per hour.
Practice with the exact products you’ll use on race day. If the race provides a specific sports drink, buy some and train with it. If you plan to use gels, train with those same gels. Different carbohydrate sources absorb differently, and your gut adapts to specific formulations.
Also practice eating at race intensity. Your body digests differently at easy aerobic pace versus threshold effort. Many athletes find they can tolerate less at higher intensities. Know your limits before race day.
Be consistent with timing. If you plan to take nutrition every 20 minutes in the race, practice that pattern in training. Your gut learns to anticipate food and prepare digestive enzymes accordingly.
Finally, practice your backup plan. What will you do if your stomach rebels? Having a protocol – slowing down, sipping water, waiting 15 minutes – can save your race when things go sideways.
Caffeine for Triathlon Performance
Caffeine is one of the few ergogenic aids with solid scientific support. It reduces perceived exertion, improves focus, and can enhance fat oxidation. Used correctly, it’s a powerful tool. Used incorrectly, it can cause jitters, GI distress, and crashes.
Dosage and Timing (3-6 mg Per kg Body Weight)
The research-supported dose is 3 to 6 milligrams of caffeine per kilogram of body weight. For a 70 kg athlete, that’s 210 to 420 mg. To put that in perspective, an 8-ounce cup of coffee contains about 95 mg. Most caffeinated gels contain 25 to 50 mg.
Start with the lower end of the range, especially if you’re sensitive to caffeine. More is not always better – doses above 6 mg per kg can cause negative side effects without additional performance benefit.
When to Take Caffeine During the Race
Caffeine takes 30 to 60 minutes to peak in your system. For shorter races, take it 30 to 45 minutes before your start. For longer races, you can spread it out – some before the swim, more on the bike, and a final dose late in the run when fatigue sets in.
Many athletes use caffeine strategically when they need a boost: before a hard section of the bike course, or at mile 18 of the marathon when the wheels start coming off. Plan your caffeine timing around the race course, not just the clock.
Caffeine Sensitivity Warnings
Caffeine sensitivity varies enormously between individuals. Some athletes can drink coffee all day and sleep fine. Others feel wired from a single cup. You must test your personal tolerance in training.
If you’re caffeine naive – you rarely consume it – approach with caution. Start with small amounts in training and see how you respond. The race environment, with its added stress and adrenaline, can amplify caffeine’s effects.
Also consider that caffeine is a diuretic, though research suggests this effect is milder in habitual users. Still, if you’re prone to dehydration, account for this in your fluid planning.
Common Fueling Mistakes to Avoid
After years of racing and talking to hundreds of triathletes, I’ve seen the same fueling errors again and again. Learn from these mistakes so you don’t repeat them.
Mistake 1: Trying something new on race day. This is the cardinal sin of triathlon nutrition. That free sample gel at the expo might look tempting, but race day is not the time to experiment. Use only products you’ve tested in training.
Mistake 2: Starting too late. By the time you feel hungry or tired, you’re already in a deficit. Start fueling early in the bike leg, within the first 15 to 20 minutes.
Mistake 3: Not drinking enough early. Dehydration compounds over time. Start hydrating from the beginning of the bike, not when you feel thirsty in mile 15 of the run.
Mistake 4: Overdoing the fiber. Race week is not the time for large salads, beans, or whole grains. Keep fiber low to reduce GI distress risk.
Mistake 5: Forgetting sodium. Plain water without electrolytes can cause hyponatremia. Make sure you’re replacing sodium, especially in hot conditions or if you’re a salty sweater.
Mistake 6: Ignoring gut training. You can’t suddenly consume 90 grams of carbs per hour on race day if you’ve never practiced it. Build up gradually over months.
Mistake 7: Not having a backup plan. What if your stomach rebels? What if you drop your nutrition? What if the aid stations run out? Have contingencies ready.
What to Do When Things Go Wrong
Even perfect plans sometimes fail. GI distress strikes. You drop your nutrition. The heat is worse than expected. Here’s how to handle common fueling emergencies.
Managing GI Distress During a Race
If nausea hits, slow down immediately. Drop your intensity to a walk or easy spin for 2 to 3 minutes. Take small sips of water or a bland drink like flat cola. Let your stomach settle before attempting more calories.
Once symptoms ease, restart with small amounts. Half a gel or a few sips of sports drink. Wait 10 to 15 minutes before taking more. Sometimes backing off for just a few minutes can save your entire race.
If you’re on the bike and have multiple bottles, switch to plain water for 15 to 20 minutes. Sometimes the concentration of sports drinks is the problem.
Signs of Bonking and How to Recover
Bonking signs include sudden fatigue, confusion, irritability, and an inability to maintain your pace. Your brain feels foggy. Simple decisions become hard. If this happens, you need fast carbohydrates immediately.
Take a gel or anything with simple sugars – even cola or sports drink if that’s what’s available. Don’t worry about the perfect nutrition plan. You need glucose in your bloodstream now.
Reduce your pace to whatever you can sustain. You won’t fully recover during the race, but you can often limp to the finish if you manage it correctly. Walking is better than quitting.
Dealing With Flavor Fatigue
After hours of sweet gels and drinks, your taste buds revolt. The thought of another gel makes you gag. This is flavor fatigue, and it’s common in long races.
Switch to savory options if available. Many Ironman aid stations offer broth, pretzels, or potato chips in the latter miles. If you’ve packed your own nutrition, include something non-sweet like peanut butter crackers.
Plain water can reset your palate. Rinse your mouth, spit it out, then try your nutrition again. Sometimes a 5-minute break from flavors is all you need.
Choosing Your Fueling Products: A Practical Guide
The sports nutrition market is overwhelming. Gels, chews, bars, drinks, powders – how do you choose? Here’s a practical breakdown based on real-world use.
Gels are the most portable and fastest to absorb. They typically provide 20 to 25 grams of carbohydrate in a compact package. The downside is they’re concentrated and require water to digest properly. Some people find them too sweet or they cause stomach issues.
Chews are easier to consume when your mouth is dry and give you something to do during long efforts. They take longer to eat than gels, which can be good or bad depending on the situation. Most provide similar carbohydrate to gels per serving.
Bars work well on the bike but are difficult to eat while running. They provide more substantial nutrition – often 30 to 45 grams of carbohydrate plus some protein and fat. Good for long rides when you want something solid.
Sports drinks provide fluid, carbs, and electrolytes in one package. They’re less concentrated than gels, making them easier on the stomach. The downside is weight – carrying enough for a long race isn’t practical, so you need aid stations or special needs bags.
Real food like bananas, dates, and pretzels works for some athletes, especially in long races. Your body recognizes these foods, and they often sit better than engineered products. The downside is inconsistent nutrition and portability issues.
Budget-Friendly DIY Fueling Options
Brand-name sports nutrition is expensive. A full Ironman can cost $50 or more in gels and drinks. If budget is a concern, there are effective DIY alternatives that cost a fraction of the price.
Maltodextrin and fructose mix: Buy bulk maltodextrin and fructose powder. Mix in a 2:1 ratio for optimal absorption. This costs about $0.50 per hour of fueling versus $3 to $5 for commercial products. Many serious age-groupers swear by this approach.
Rice cakes: White rice, salt, and a bit of honey make excellent race fuel. They’re bland, easily digestible, and cost pennies per serving. Popular among cyclists and triathletes doing long training sessions.
Dates: Medjool dates provide about 15 grams of carbohydrate each, plus potassium and natural sugars. They’re portable, minimally processed, and cost a fraction of energy chews.
Homemade sports drink: Mix 60 grams of sugar, 1/4 teaspoon of salt, and a splash of lemon juice in 1 liter of water. This provides carbohydrates and electrolytes at a fraction of the cost of commercial drinks.
The key with DIY options is testing them extensively in training. They work great for many athletes, but your gut needs time to adapt.
Sample Race Day Timeline
Here’s how a fueling plan might look for a 70.3 race starting at 7:00 AM:
4:00 AM – Wake up: Drink 500 ml water with electrolytes. Begin breakfast prep.
4:30 AM – Breakfast: Oatmeal with banana and honey, plus 100 mg caffeine from coffee or tea. Finish eating by 5:00 AM.
6:15 AM – Pre-race: One gel with 150 ml water. Final bathroom visit.
7:00 AM – Race start: Begin swimming.
7:35 AM – T1: Quick sip of water from bike bottle. Begin fueling plan.
7:50 AM – Bike (mile 5): First gel with water. Begin 20-minute nutrition timer.
Every 20 minutes on bike: Alternate between gel and sports drink. Target 60 to 80 grams carbs per hour.
Mile 40 – Caffeine boost: Caffeinated gel or drink for the second half of the bike.
10:30 AM – T2: Grab final gel for the run. Switch to running fuel belt.
Miles 1, 5, 9, 13 of run: Gel or aid station nutrition. Water or sports drink at every aid station.
Mile 10 – Final caffeine: Cola or caffeinated gel if needed for the finish.
12:30 PM – Finish: Begin recovery nutrition immediately.
Frequently Asked Questions
What should I eat the night before my first triathlon?
Eat a carbohydrate-rich dinner 12 to 14 hours before your start time. Good options include pasta with marinara sauce, white rice with grilled chicken, or a baked potato with minimal toppings. Keep fiber and fat low to avoid GI distress. Avoid spicy foods, cream sauces, and heavy meats. Drink water normally throughout the day.
How much carbohydrate should I consume per hour during a triathlon?
It depends on race distance. Sprint triathletes typically don’t need in-race carbs. Olympic distance athletes need 30 to 60 grams per hour. Half-Ironman athletes need 60 to 90 grams per hour. Full Ironman athletes can consume 90 to 120 grams per hour if they’ve trained their gut. Start at the lower end and build up gradually.
Do I need caffeine during my first triathlon?
Caffeine can help performance but isn’t essential, especially for shorter races. If you already consume caffeine regularly, a moderate dose of 3 to 6 mg per kilogram of body weight may help. If you’re caffeine-sensitive or it’s your first race, focus on getting your carbohydrate and hydration right before adding caffeine.
What is the best hydration strategy for triathlon?
Know your sweat rate through testing. Replace fluids according to conditions – typically 500 to 750 ml per hour. Include sodium to prevent hyponatremia. Drink to thirst rather than forcing fluids. Practice your hydration plan in training. Adjust for heat and humidity. Use sports drinks or electrolyte supplements, not just plain water.
How to train your gut for race day?
Start by consuming 30 grams of carbohydrate per hour during long training sessions. Every 2 to 3 weeks, increase by 10 to 15 grams. Practice with the exact products you’ll use in your race. Train at race intensity since digestion changes with effort. Be consistent with timing. Over months, you can train your gut to handle 90 to 120 grams per hour.
Should I try new products on race day?
Absolutely not. This is the most common fueling mistake triathletes make. Only use products you’ve tested extensively in training. Race day is not the time to experiment with new gels, drinks, or foods. Stick to what you know works for your body.
Conclusion: Mastering How to Fuel During a Triathlon
Fueling isn’t complicated, but it is systematic. Start with a solid pre-race nutrition foundation. Top off glycogen stores with carb loading for longer events. Eat a familiar breakfast 2 to 4 hours before your start. Then execute your race plan with discipline.
On the bike – your main fueling opportunity – consume carbohydrates early and consistently. Match your intake to your race distance: nothing for sprints, 30 to 60 grams per hour for Olympic, 60 to 90 for 70.3, and up to 120 for full Ironman. Hydrate with electrolytes, not just water.
On the run, simplify. Switch to easily digestible options and adjust for the higher intensity. Have a plan for when things go wrong because eventually, they will.
Most importantly, remember that how to fuel during a triathlon is a skill you develop through practice. Every long session is an opportunity to test products, timing, and quantities. Your gut is trainable. Your strategy will evolve. Start simple, be consistent, and never try anything new on race day.
Get your nutrition right, and you’ll cross that finish line strong. Get it wrong, and even perfect training won’t save you. The choice – and the preparation – is yours.